Klaviyo to Power BI integration
Set up the automated zero-code Klaviyo to Power BI integration with Coupler.io. Use reliable connectors to collect your data and transform it on the go. Create visual reports using templates to get insights into your marketing strategies.


Connect Klaviyo to Power BI with Coupler.io to simplify reporting
Get and prepare data effortlessly
Coupler.io enables effortless data import from Klaviyo to Power BI through its no-code interface and built-in transformation options. Collect and organize data effortlessly with reliable connectors. Join Klaviyo data with other marketing sources' data within the same UI.
Automate reporting tasks
Schedule data exports from Klaviyo to Power BI to automate your reporting using Coupler.io. Reduce manual intervention, build comprehensive cross-app reports, and use customizable dashboard templates for striking data visualization.
Stand out as a data-driven expert
Use Coupler.io for the Klaviyo to Power BI integration, which helps achieve transparent reporting. Enhance the quality of data analysis to get timely insights into your email marketing data.
How to integrate Klaviyo to Power BI (detailed guide)
With Coupler.io, setting up the Klaviyo to Power BI integration becomes a low-hanging fruit. No coding, together with an intuitive interface, makes the entire process simple.
The setup flow can be divided into two subprocesses, each containing a bunch of easy and fast steps.
Actions in Klaviyo
Actions in Coupler.io
Step 1: Collect Klaviyo data
Create a new importer with Klaviyo as a source and Power BI as a destination. Under the source settings, connect to your Klaviyo account and paste the private API key in the corresponding field.
Then, select the data entity for export from Klaviyo to Power BI.
Configure other required source settings and proceed to the next step.
Step 2: Transform your data
Before you connect Klaviyo to Power BI and send data there, it’s necessary to make it analysis-ready. For that, use the options offered by Coupler.io for data preparation and management:

Take a look at your Klaviyo data once again and decide whether it’s ready for export. If everything is okay, proceed to the Destination tab.
Step 3: Load and schedule refresh
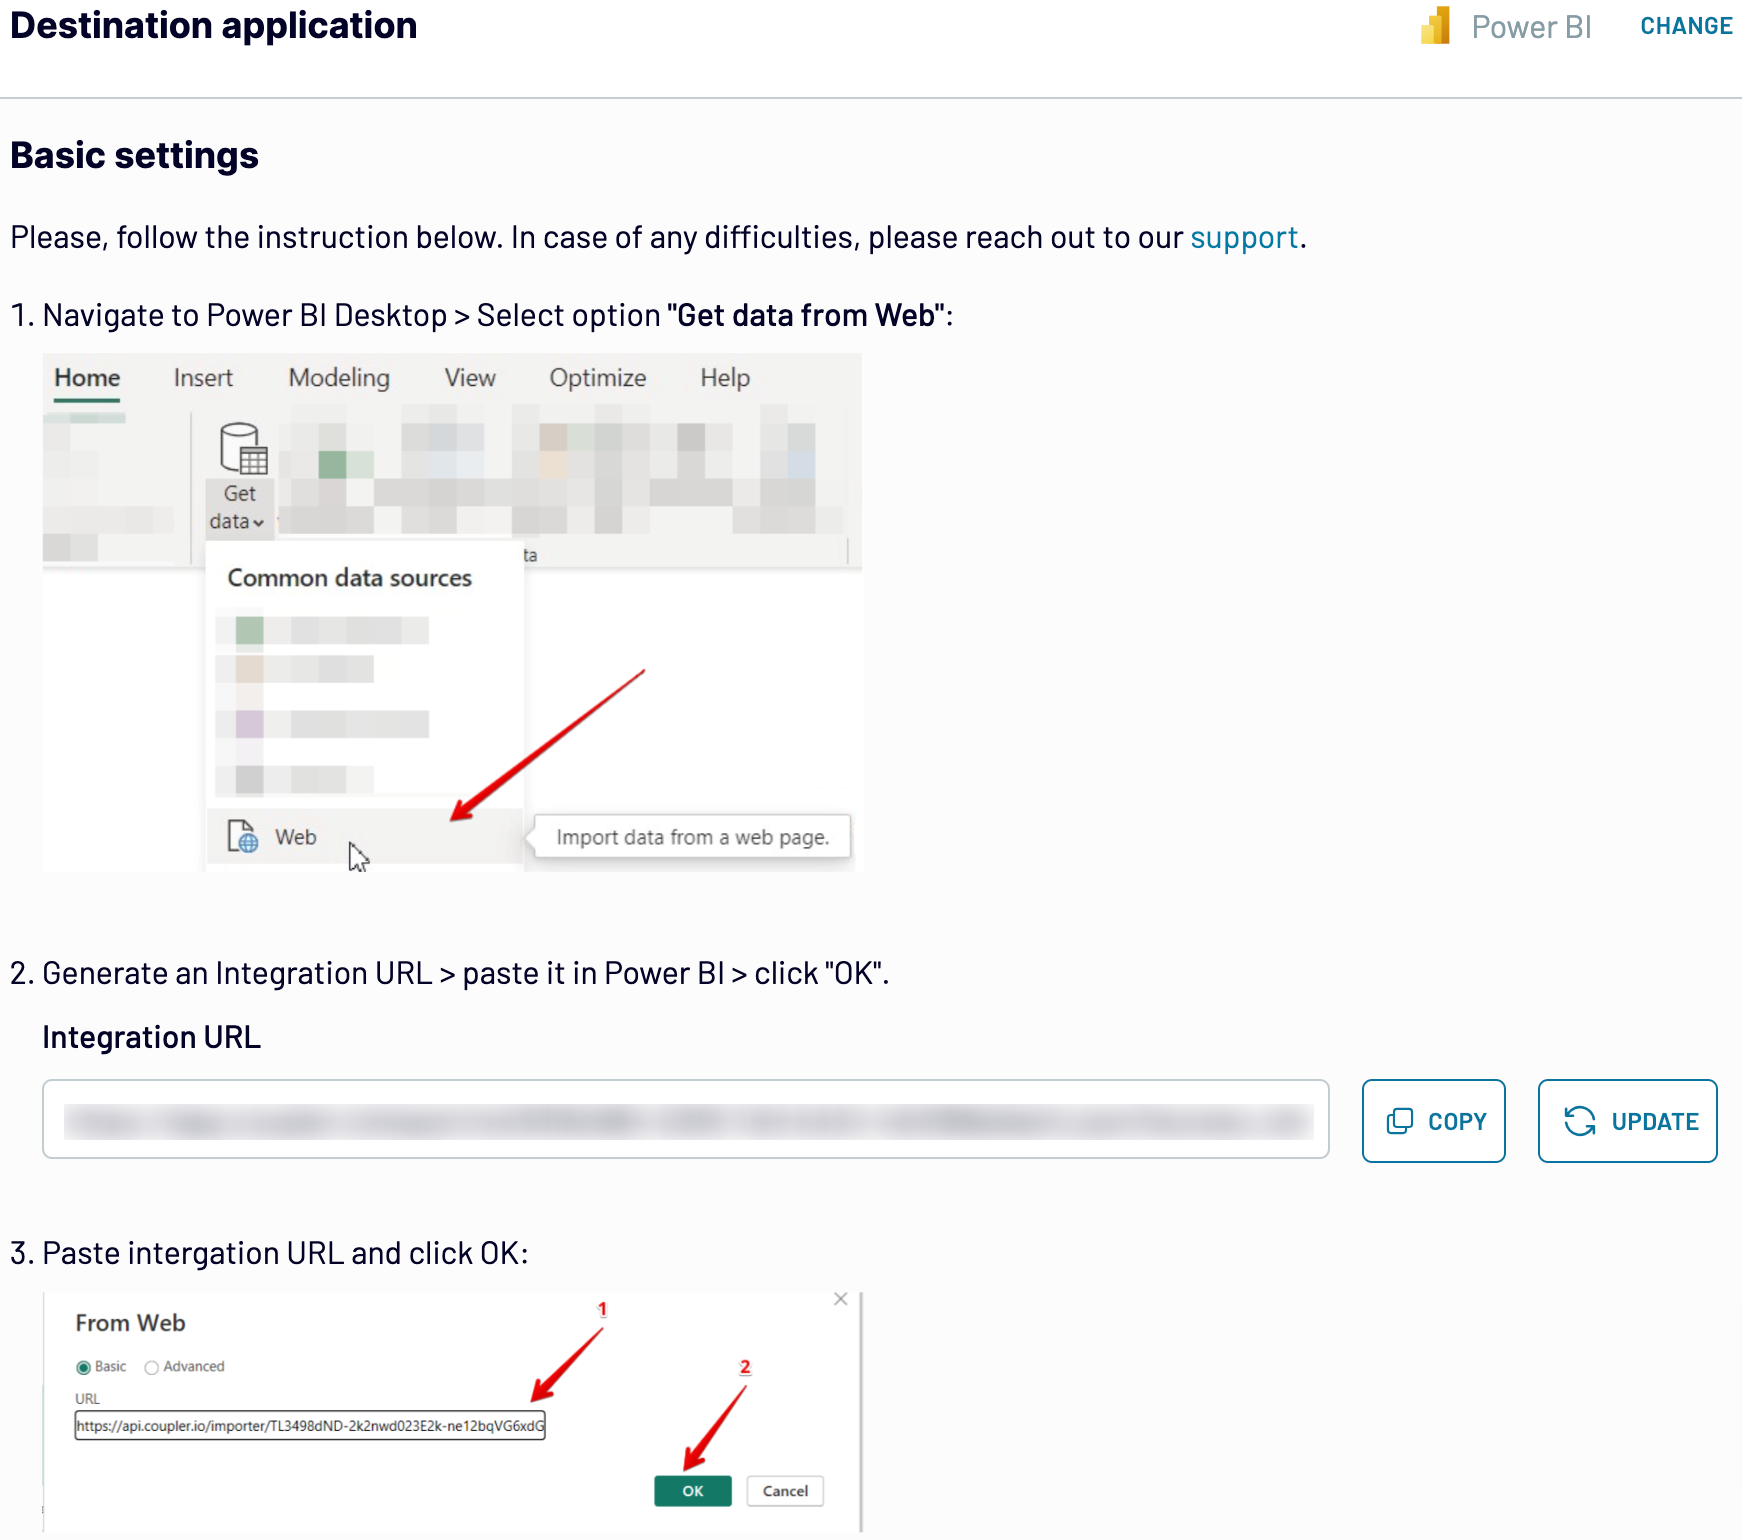
At this step, you will need to connect to Power BI in order to start populating your reports with data.
In Coupler.io, under the destination settings, generate the integration URL.
In Power BI Desktop, go to Get data -> Web from the upper menu. Paste the integration URL in the corresponding field and click OK.
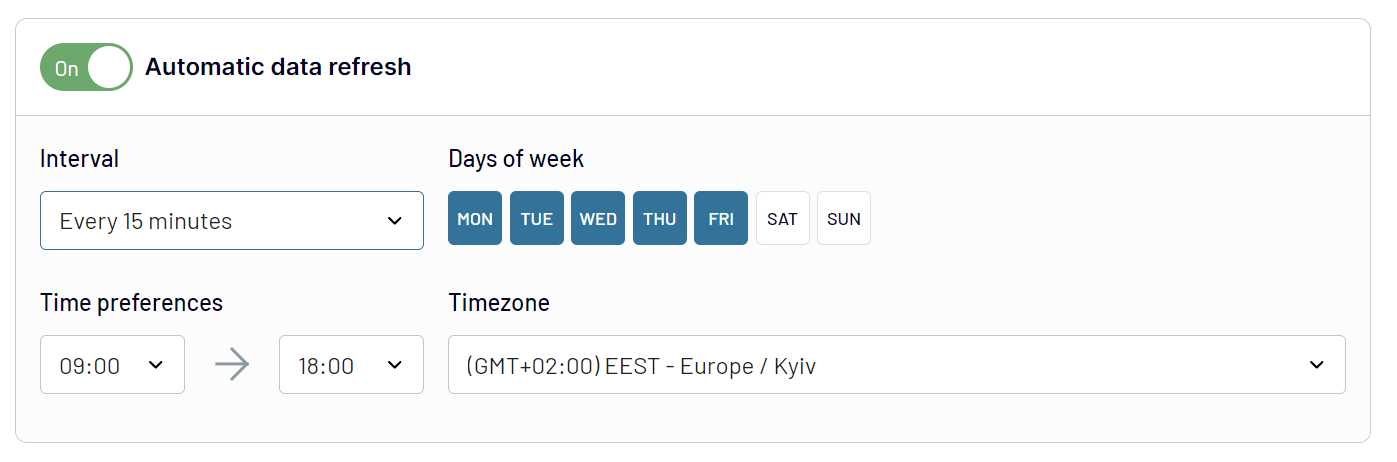
In Coupler.io, go to the Scheduling tab to make the Klaviyo data exports automated and regular. For that, specify the data refresh intervals or concrete times for data transfer.
Once all the integration settings are configured, save the importer. Click Run to start the integration.
The setup flow can be divided into two subprocesses, each containing a bunch of easy and fast steps.
Actions in Klaviyo
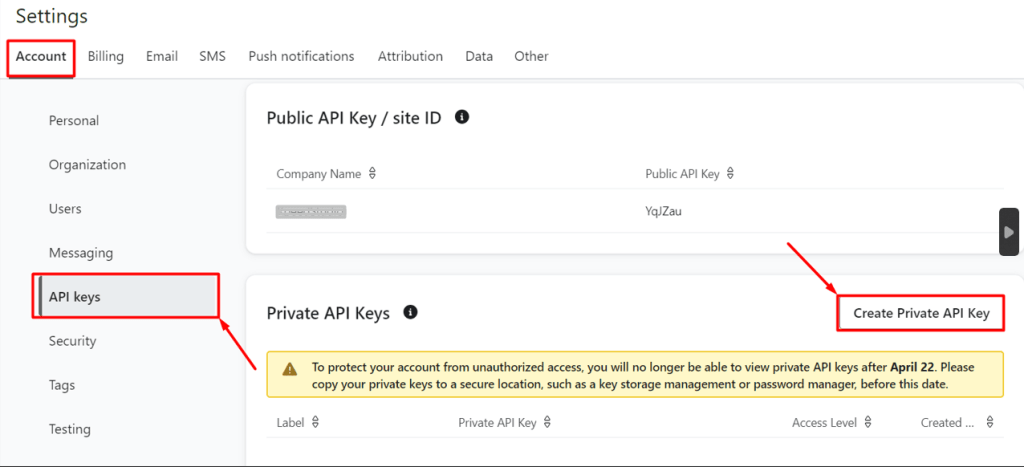
- In your Klaviyo account, go to Settings at the bottom-left corner of your profile. In the Account tab, click on API keys to get the public API key.
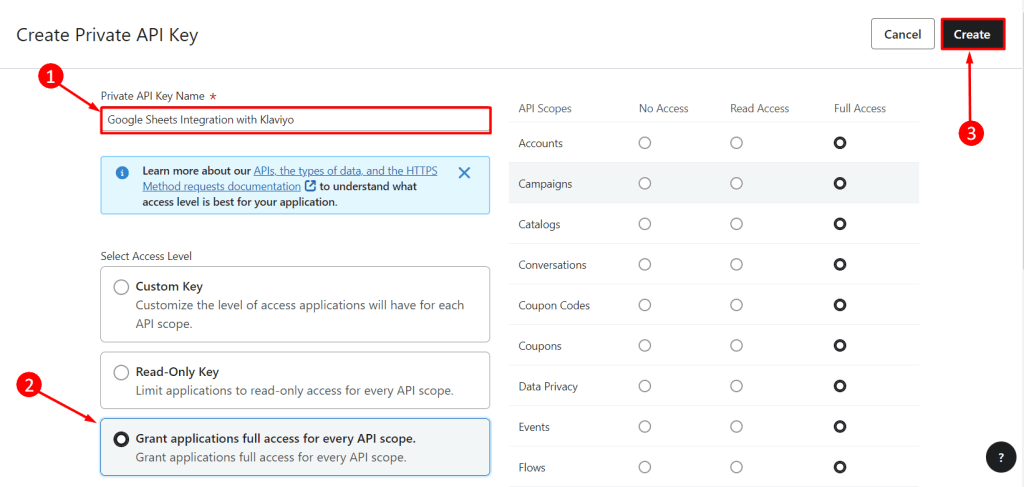
- Then, click Create Private API Key to generate a private API key. Specify its name and select the access level.
- Click Create to generate a private API key, which is necessary to access your Klaviyo account securely.
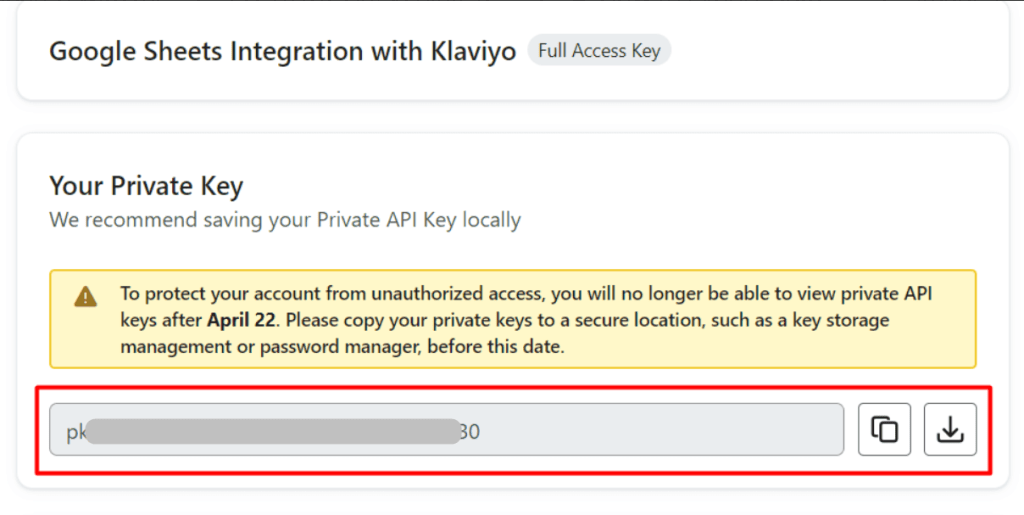
- Copy the private API key and download it on your computer. This is necessary to integrate your Klaviyo account with other third-party apps.
Actions in Coupler.io
Step 1: Collect Klaviyo data
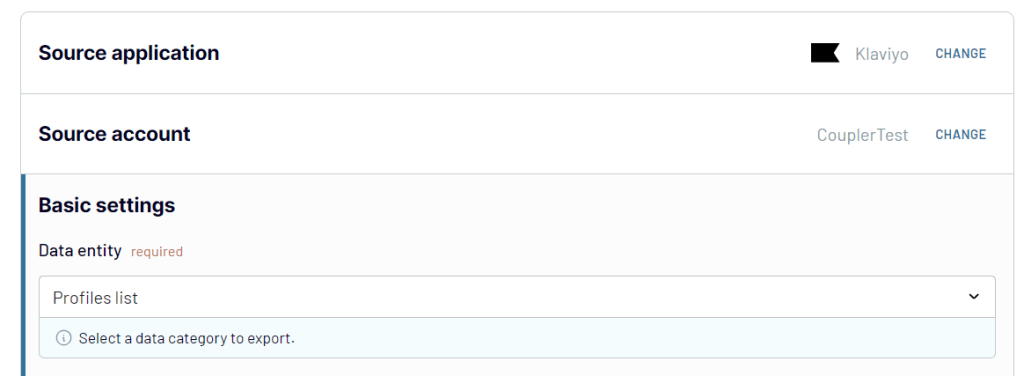
Create a new importer with Klaviyo as a source and Power BI as a destination. Under the source settings, connect to your Klaviyo account and paste the private API key in the corresponding field.
Then, select the data entity for export from Klaviyo to Power BI.
Configure other required source settings and proceed to the next step.
Step 2: Transform your data
Before you connect Klaviyo to Power BI and send data there, it’s necessary to make it analysis-ready. For that, use the options offered by Coupler.io for data preparation and management:
- Data preview
- Data sorting
- Data filtering
- Data blending
- Data appending
- Column renaming and reordering
- Column hiding
- Adding formula-based metrics in new columns
Take a look at your Klaviyo data once again and decide whether it’s ready for export. If everything is okay, proceed to the Destination tab.
Step 3: Load and schedule refresh
At this step, you will need to connect to Power BI in order to start populating your reports with data.
In Coupler.io, under the destination settings, generate the integration URL.
In Power BI Desktop, go to Get data -> Web from the upper menu. Paste the integration URL in the corresponding field and click OK.
In Coupler.io, go to the Scheduling tab to make the Klaviyo data exports automated and regular. For that, specify the data refresh intervals or concrete times for data transfer.
Once all the integration settings are configured, save the importer. Click Run to start the integration.
Export Klaviyo to Power BI on a schedule
Automated data export from Klaviyo to Power BI with Coupler.io enhances your reporting accuracy. Such automation is crucial for supplying your dashboards with fresh data. This helps to maintain up-to-date dashboards, creating a solid base for timely decision-making.
Coupler.io's automatic data refresh feature allows you to set a schedule that suits your needs. The data refresh intervals range from every month to every 15 minutes. You can also choose specific days of the week, preferred times, and time zones to add extra flexibility. Such regular data refreshes enable you to spend time on strategic decisions rather than routine procedures.
Coupler.io's automatic data refresh feature allows you to set a schedule that suits your needs. The data refresh intervals range from every month to every 15 minutes. You can also choose specific days of the week, preferred times, and time zones to add extra flexibility. Such regular data refreshes enable you to spend time on strategic decisions rather than routine procedures.
Export data from Klaviyo to alternative destinations


Quick start with Marketing dashboard templates
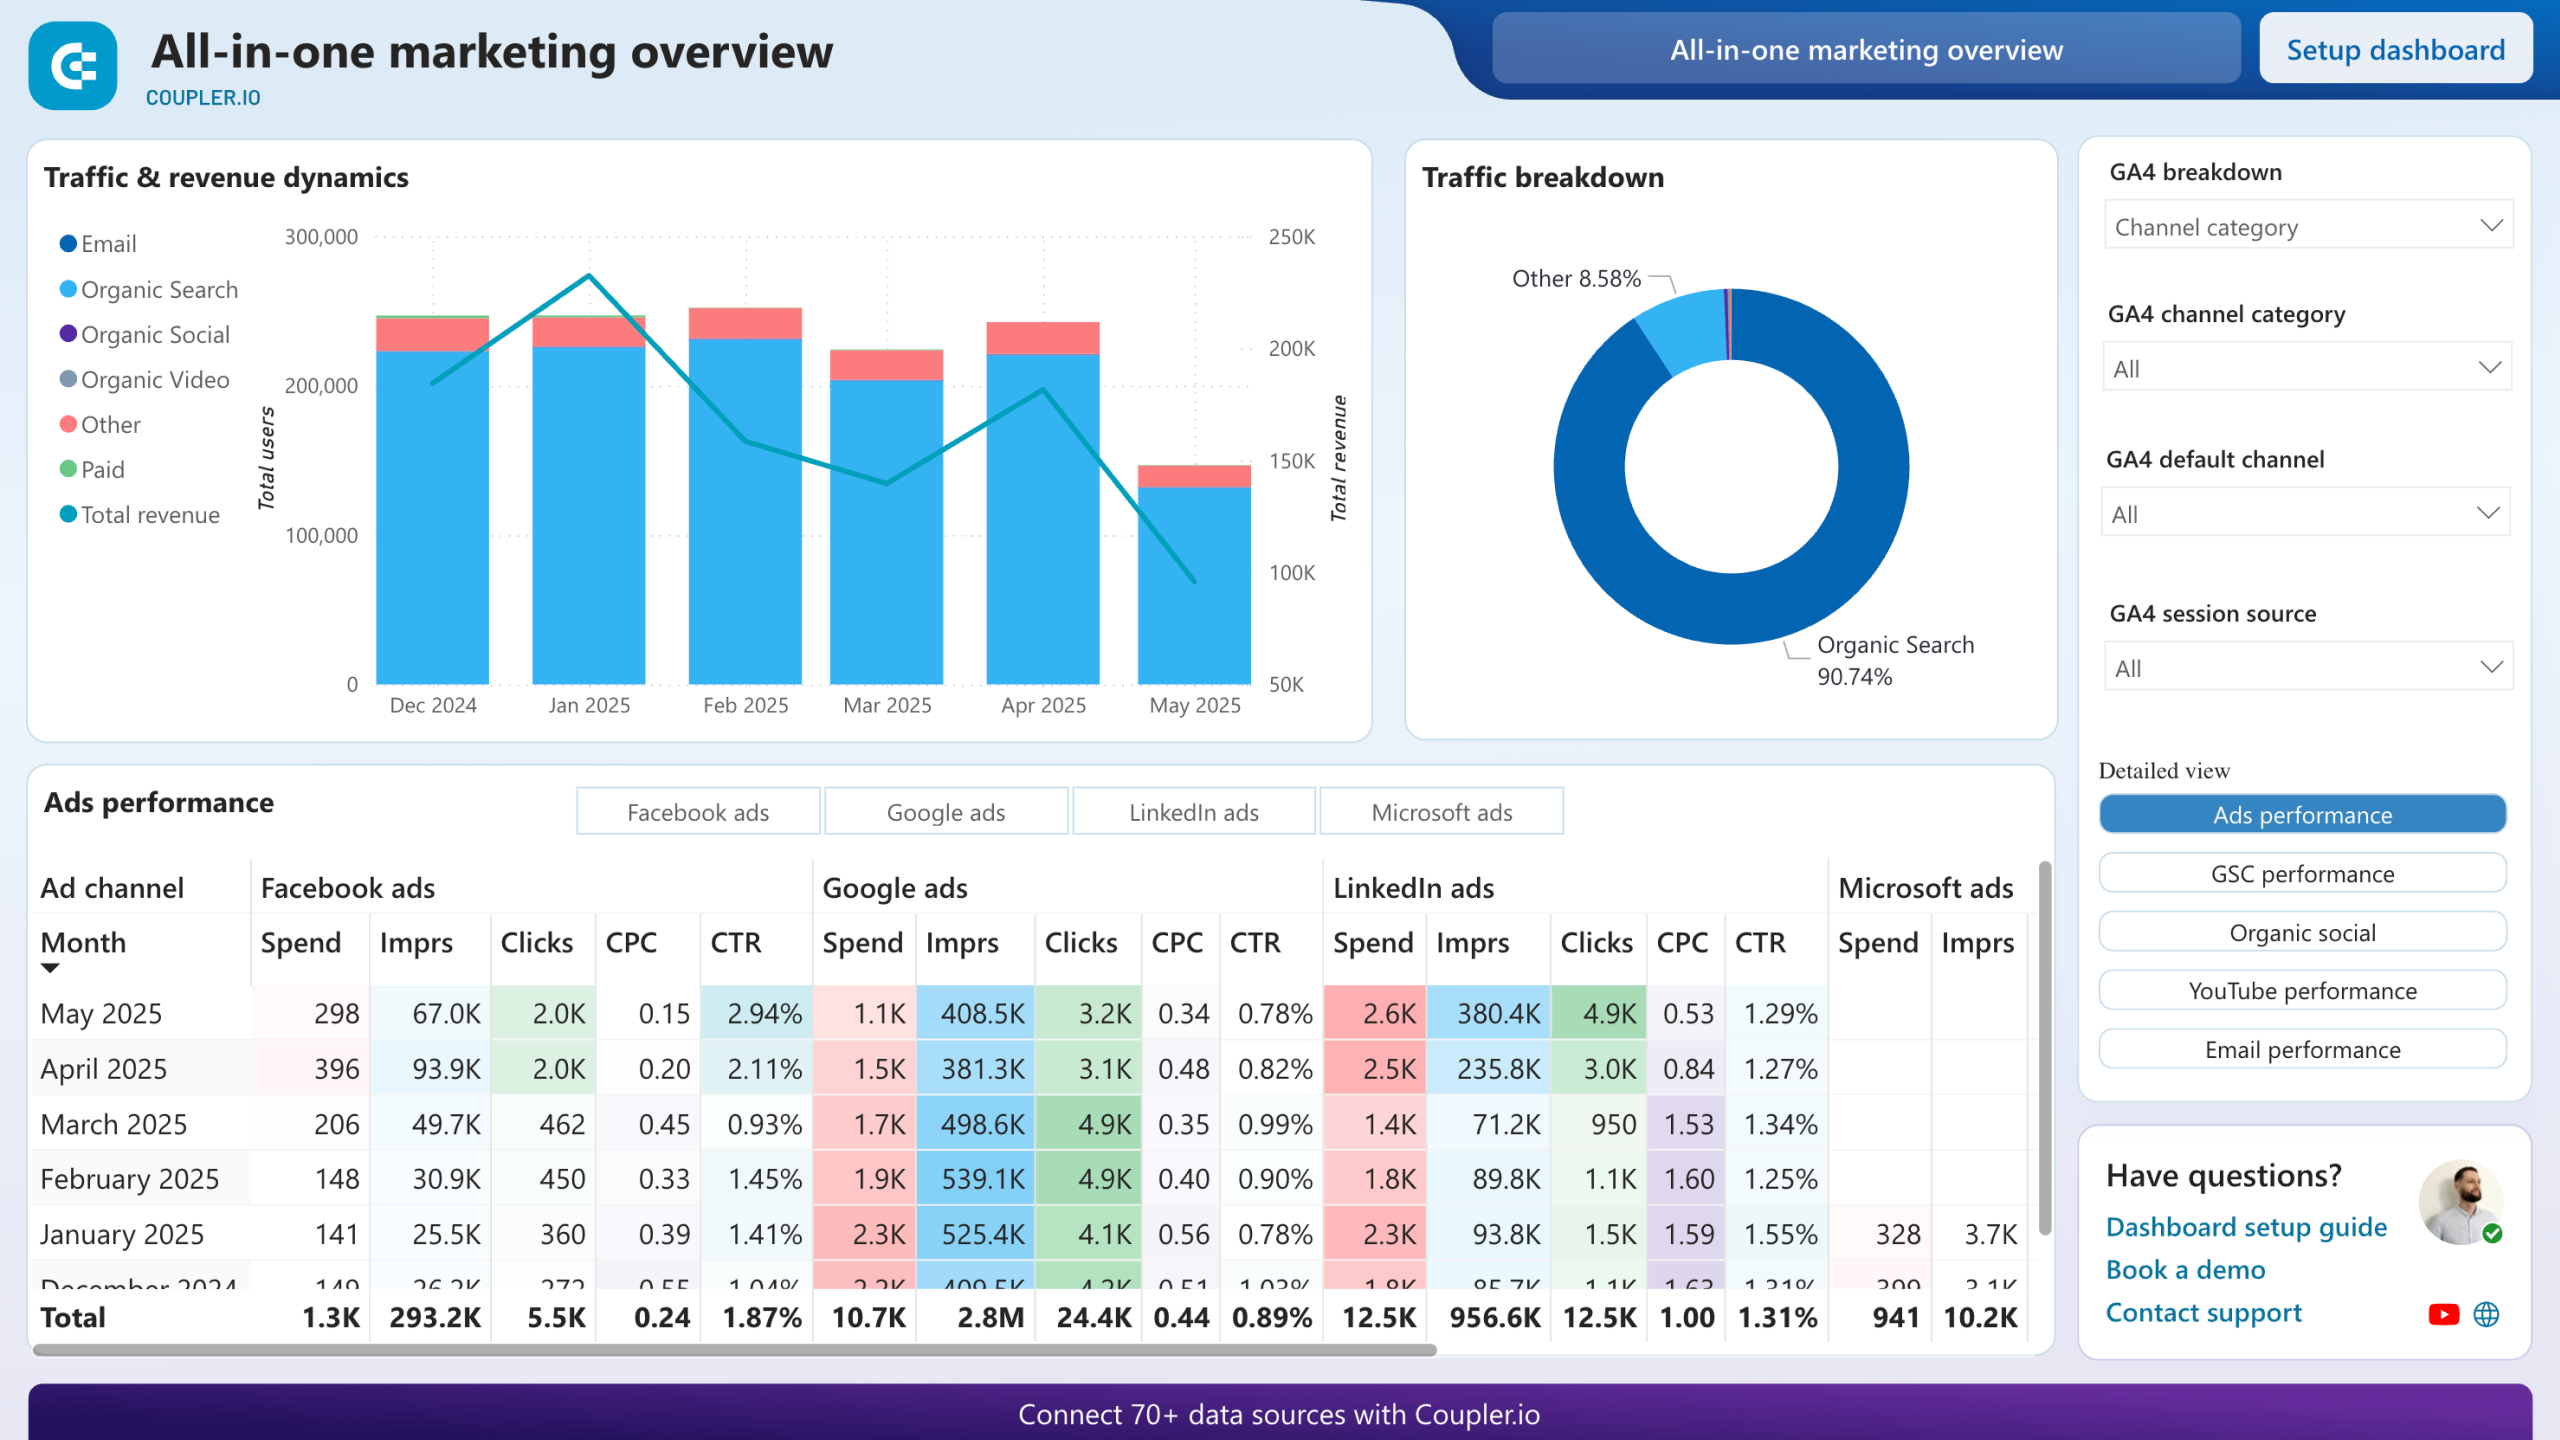
All-in-one marketing dashboard


 +5
+5
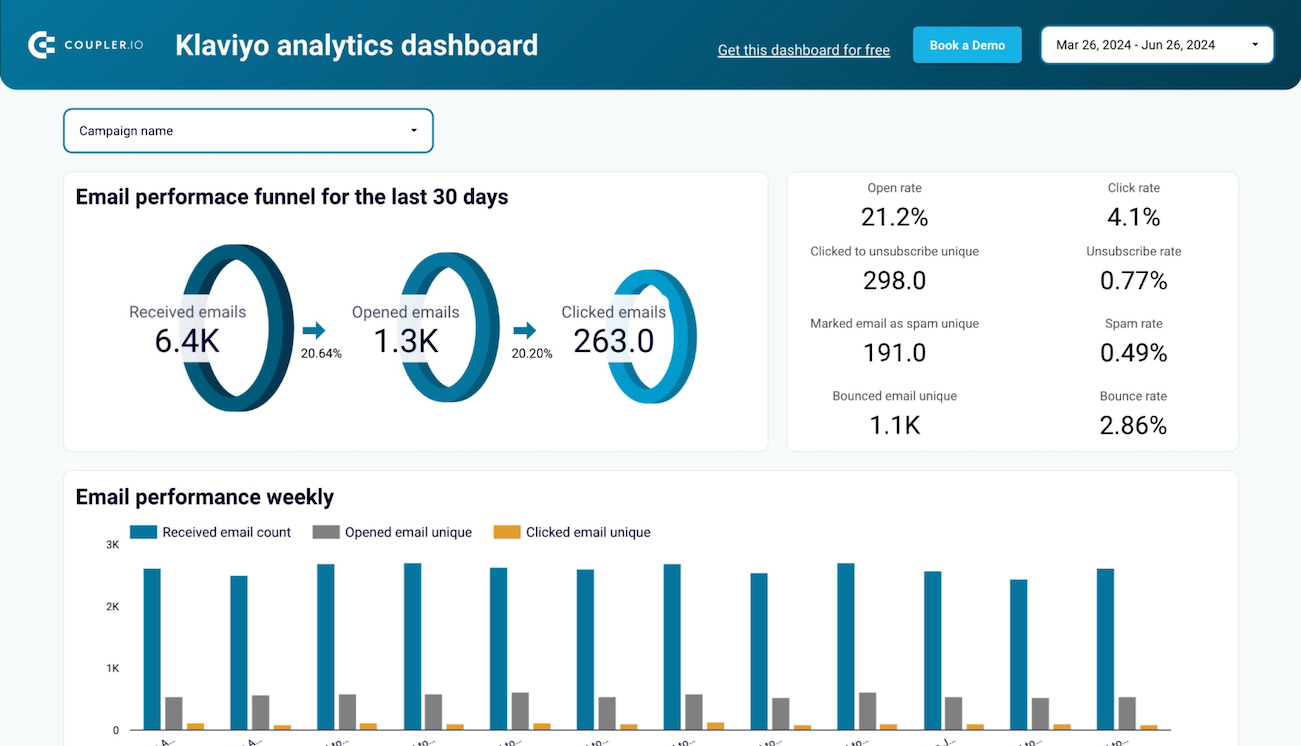
Klaviyo analytics dashboard

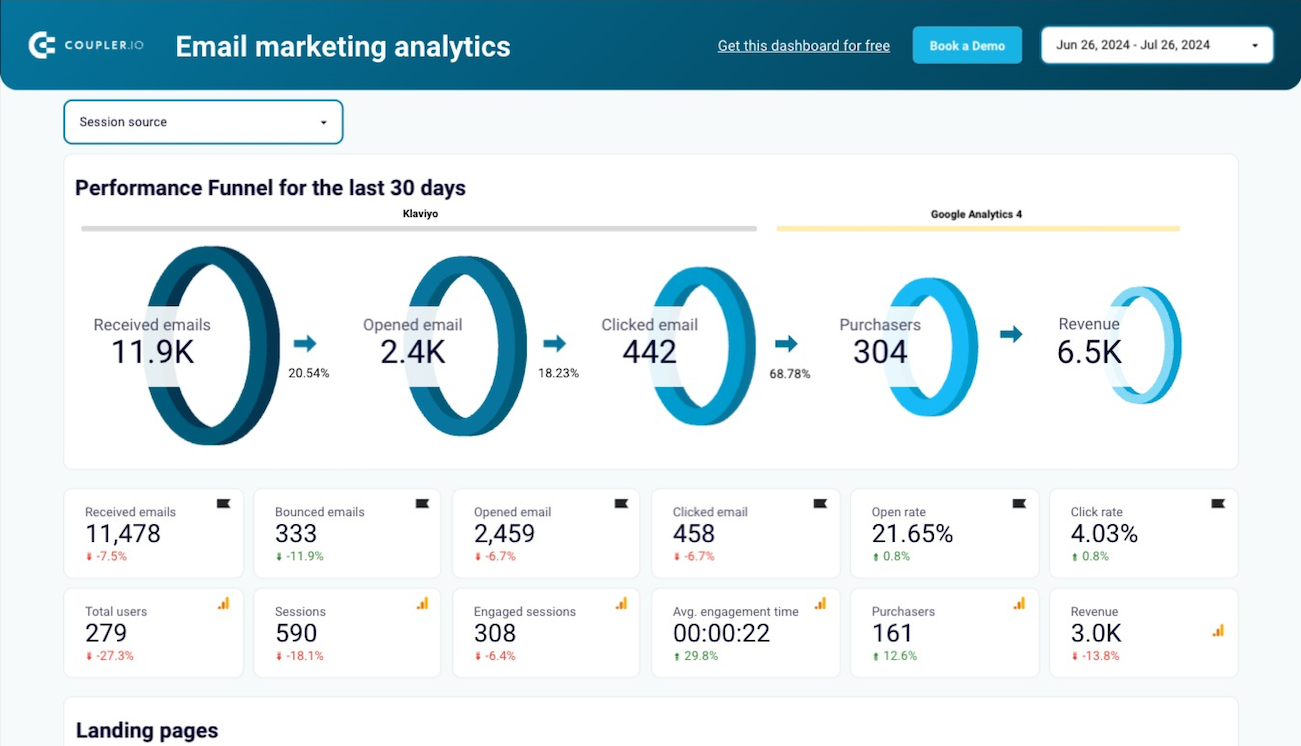
Email marketing analytics dashboard for Klaviyo

No such template is available yet.
No worries. Our team will create a template that fits your needs, just tell us more
about your case. It doesn't cost you a penny 😉
Request a custom report
about your case. It doesn't cost you a penny 😉
Export Klaviyo to Power BI automatically with just a few clicks.
Connect similar Marketing apps and get data in minutes


What to export from Klaviyo to Power BI

Campaigns List
This data encompasses click-through rates, conversion rates, and other marketing campaign metrics. Connect Klaviyo to Power BI to analyze this data and see how to improve your email marketing strategies. See how to improve audience engagement through email campaign optimization.
Profiles List
Behaviors, engagement points, and demographic information make up the profile data. Analyze and visualize this data in Power BI to get a better understanding of your audience. Refine your marketing strategies to meet the expectations of different customer segments.
Reports
Reports contain details about campaigns, including revenues and customer retention rates. Connect Klaviyo to Power BI to evaluate the email marketing campaign performance. With this analysis, generate ideas on how to increase revenue and improve your brand image.
How do you connect Klaviyo to Power BI?
Step 1. Obtain the Klaviyo API key to connect your account and choose the type of data to export
Step 2. Organize and transform data before loading it into Power BI
Step 3. Generate and copy the integration URL to the Power BI desktop app
Step 4. Schedule auto-refreshes to export Klaviyo to Power BI at desired intervals
Pricing plans
- Monthly
- Annual (save 25%)
Your data is secured by industry standards
 Google Cloud
Certified
 SOC 2 Type II
Certified
 GDPR
GDPRCompliant
 HIPAA
HIPAACompliant
Don’t just take our word for it


