Calendly to Power BI
Transform your workflow with Calendly to Power BI integration, which enables automated data imports and scheduled updates. Quickly extract and organize your records, have accurate reports created in minutes, and easily keep track of data.


Use Coupler.io's Calendly to Power BI integration to simplify reporting
Get and prepare data effortlessly
Connect Calendly to Power BI through Coupler.io to easily transfer your data for analytics. Apply multiple data transformations, automate regular updates to your reports, and incorporate records from different sources into a single dataset.
Automate reporting tasks
Say goodbye to the hassles of manual data entry – switch to Coupler.io's automated solution. Now, you can import data from Calendly to Power BI in just minutes. Additionally, enrich your data analysis with our free, dynamic dashboard templates.
Stand out as a data-driven expert
Boost your credibility with clients and stakeholders by presenting reports with nearly real-time Calendly data that holds substantial value. Delegate mundane tasks such as data imports and reporting to Coupler.io and prioritize strategic initiatives instead.
How to integrate Calendly to Power BI (detailed guide)
Connect Calendly to Power BI by following three simple steps:
Step 1: Collect data
Begin by authorizing your Calendly account. Then, you'll have to select the specific data type you'd like to export and adjust other required settings if there are any.
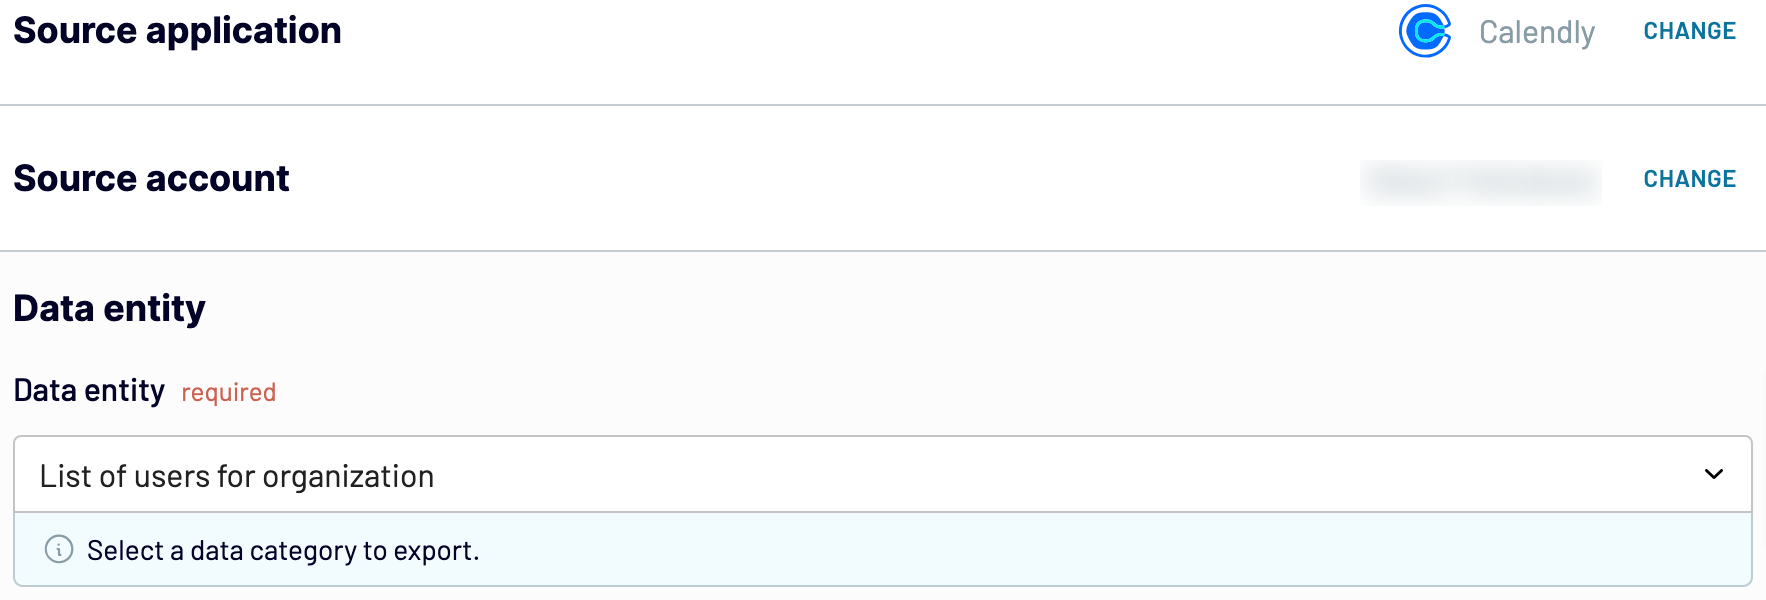
After that, proceed to the next step.
Step 2: Organize and transform
Before you load data, check whether it's accurate. If you need to change something, there are many data transformation options you can use:
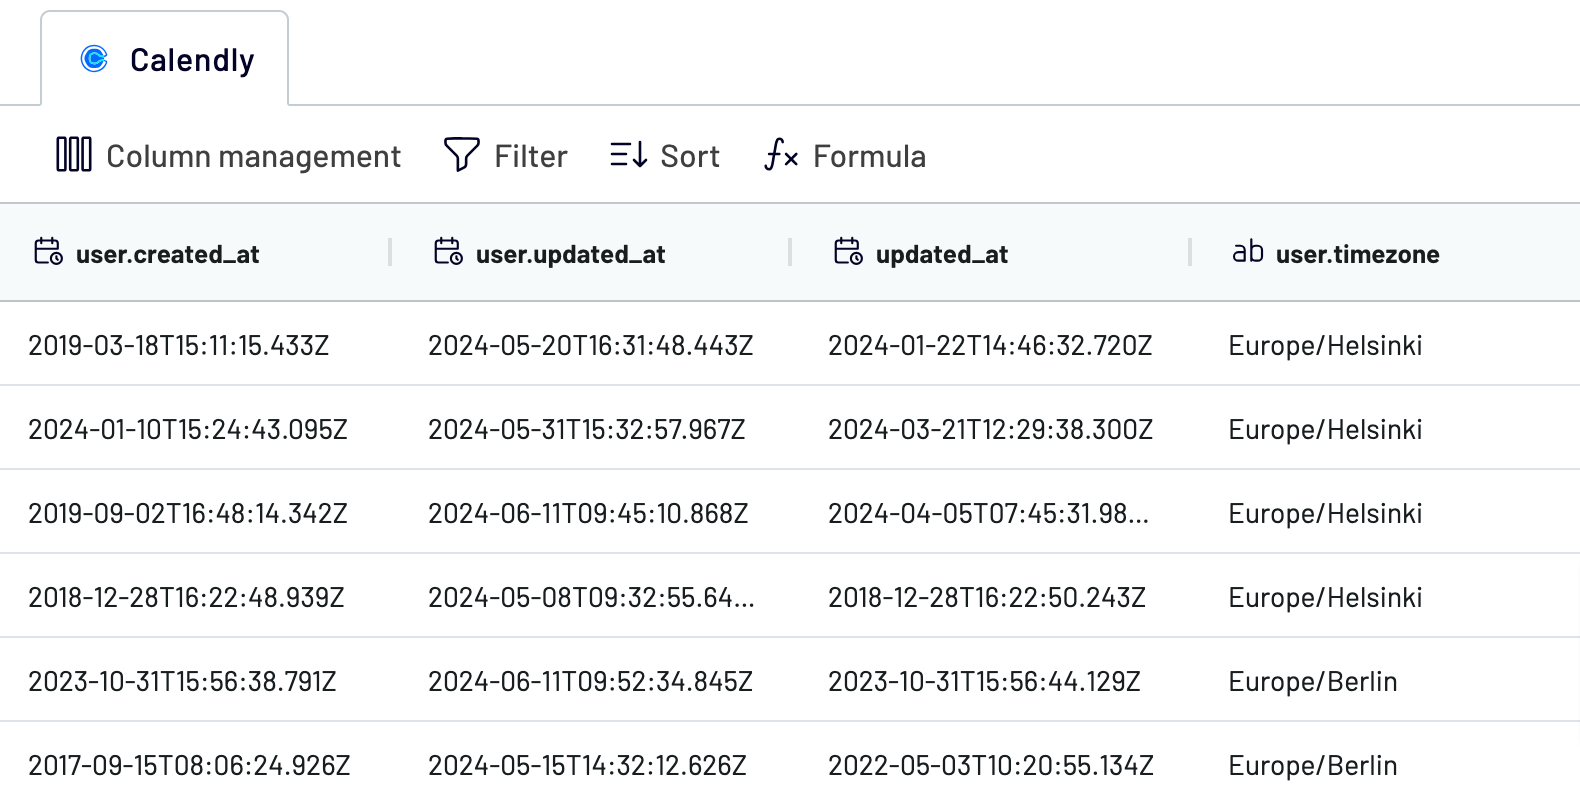
Once imported, your data is prepared for analytics without the need for further modifications.
Now, move forward to configure your destination.
Step 3: Load and automate
To transfer data from Calendly to Power BI, follow the in-app instructions to generate the integration URL and paste it into the Power BI desktop application.
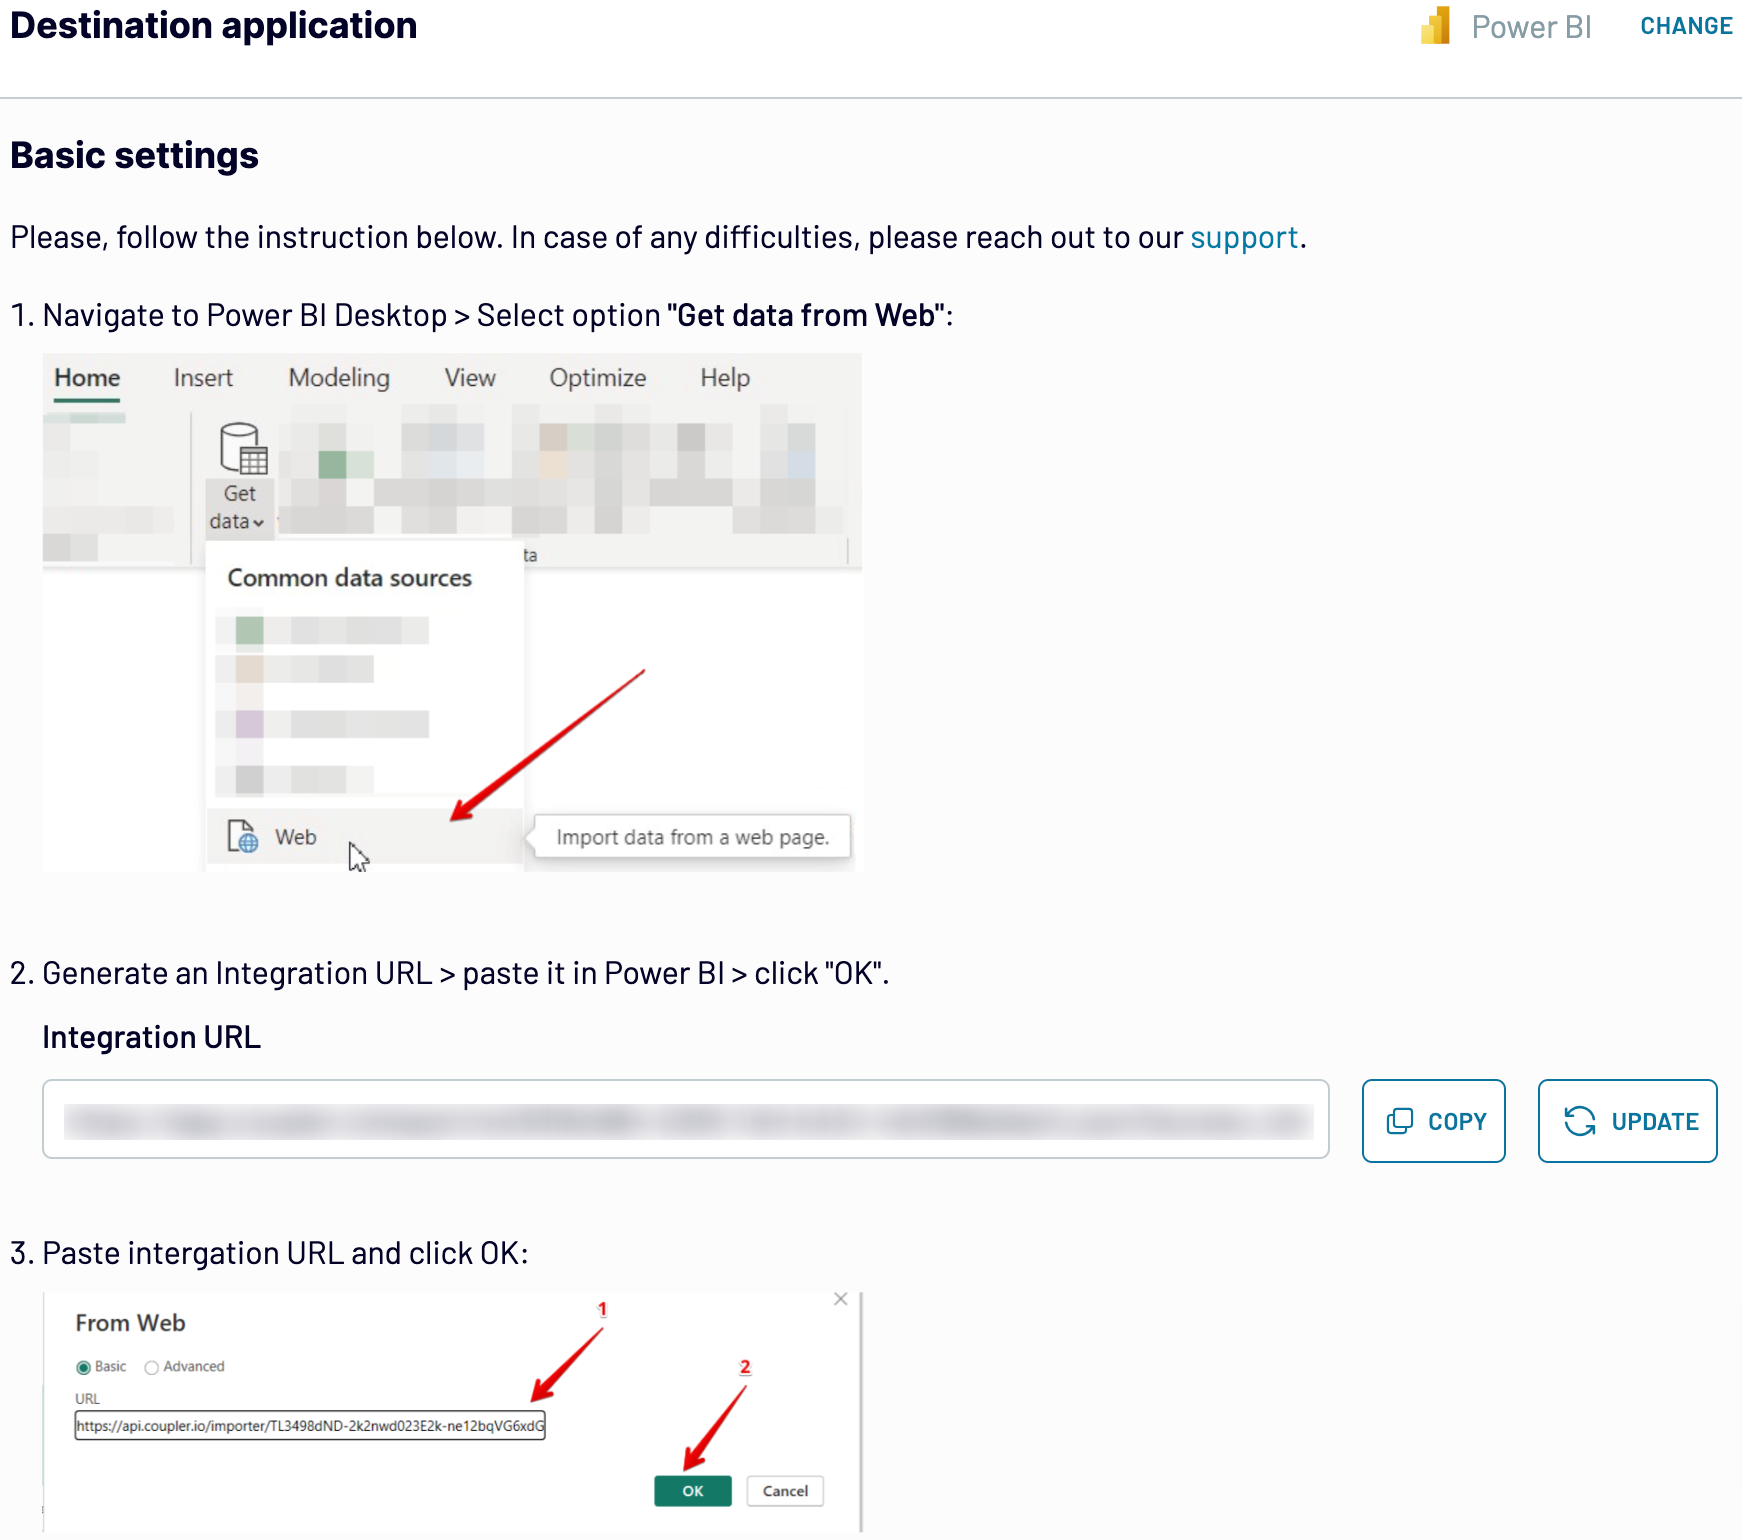
After that, proceed to set up an automated data refresh. The last action you'll take is to save and run the importer.
Step 1: Collect data
Begin by authorizing your Calendly account. Then, you'll have to select the specific data type you'd like to export and adjust other required settings if there are any.
After that, proceed to the next step.
Step 2: Organize and transform
Before you load data, check whether it's accurate. If you need to change something, there are many data transformation options you can use:
- Edit, rearrange, hide, or add columns.
- Apply various filters and sort your data.
- Create new columns with custom formulas.
- Combine data from multiple accounts or apps.
Once imported, your data is prepared for analytics without the need for further modifications.
Now, move forward to configure your destination.
Step 3: Load and automate
To transfer data from Calendly to Power BI, follow the in-app instructions to generate the integration URL and paste it into the Power BI desktop application.
After that, proceed to set up an automated data refresh. The last action you'll take is to save and run the importer.
Connect Calendly to Power BI and schedule data exports
Coupler.io's Calendly to Power BI integration ensures your data remains relevant at all times. Choose the update interval according to your preferences: monthly, daily, hourly, or as frequently as every 30 or 15 minutes. Personalize further by specifying days, the time slot, and the time zone.
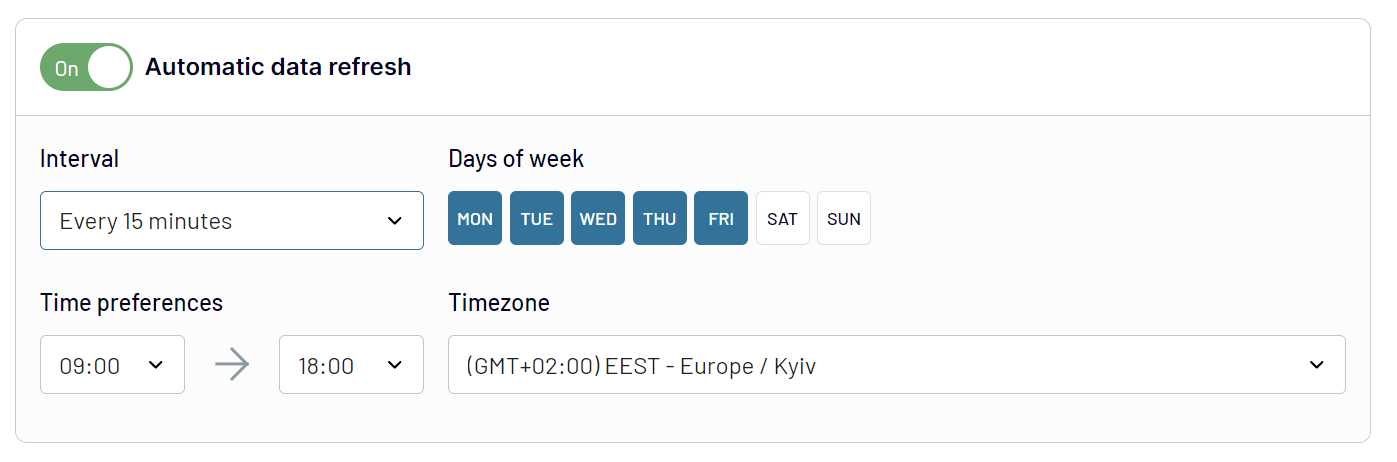
Thanks to this functionality, your report stays aligned with the ever-changing source data. Consequently, you have access to the latest information whenever needed.
Thanks to this functionality, your report stays aligned with the ever-changing source data. Consequently, you have access to the latest information whenever needed.
Export data from Calendly to alternative destinations


Quick start with Sales dashboard templates


No such template is available yet.
No worries. Our team will create a template that fits your needs, just tell us more
about your case. It doesn't cost you a penny 😉
Request a custom report
about your case. It doesn't cost you a penny 😉
Connect Calendly to Power BI automatically with just a few clicks.
Connect similar Sales apps and get data in minutes


What to export from Calendly to Power BI

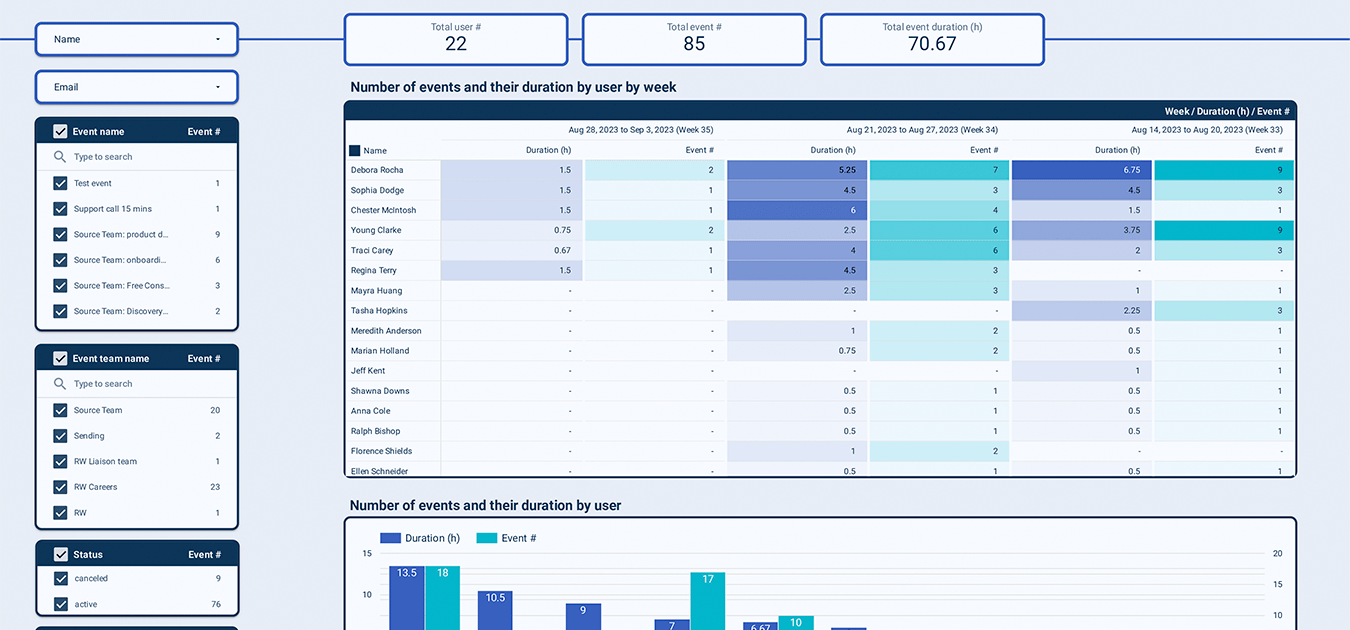
Available Time for User
The "Available Time for User" report from Calendly includes details of when a user is free to schedule meetings or appointments. This dataset covers time slots that are open for booking, which facilitates coordination and planning by displaying periods of availability.
Busy Time for User
You can also connect Calendly to Power BI to get the "Busy Time for User" report. It outlines periods when a user is unavailable or already occupied with scheduled events. It helps avoid conflicting appointments and ensures accurate scheduling by revealing times that are blocked or unavailable.
Event Types for Organizations
Data from "Event Types for Organizations" categorizes different kinds of events or meetings that an organization offers through Calendly. Each event type specifies its duration, location (if applicable), and specific settings, which optimizes scheduling options for users.
List of Users for Organization
The "List of Users for Organization" provides a roster of individuals who use Calendly. It includes contact information and availability settings, which improves internal coordination and visibility across the organization.
Routing Forms
Routing forms contain details of the configurations and rules set up to direct incoming meeting requests to appropriate users or teams based on specified criteria. It ensures efficient appointment distribution according to organizational requirements.
Scheduled Events for Organization
Another reason to use Calendly to Power BI integration is to extract data on scheduled events for the organization. It offers a log of all confirmed meetings and appointments booked through Calendly. Details include attendees, event types, and time slots, which make it easier to manage schedules.
Questions and Answers
If you transfer "Questions and Answers" from Calendly to Power BI, you will get feedback and responses gathered during scheduled events or meetings. This information contains questions posed by participants and responses provided by the organizer. So, you gain insights into session content and participant engagement.
How do you connect Calendly to Power BI?
Step 1. Connect your Calendly account and choose the data entity to export
Step 2. Organize and transform data before loading it into Power BI
Step 3. Generate and copy the integration URL to the Power BI desktop app
Step 4. Schedule auto-refreshes to export data from Calendly to Power BI at desired intervals
Pricing plans
- Monthly
- Annual (save 25%)
Your data is secured by industry standards
 Google Cloud
Certified
 SOC 2 Type II
Certified
 GDPR
GDPRCompliant
 HIPAA
HIPAACompliant
Don’t just take our word for it


